
If you want a quick way to spice up any lamp, the easy solution is to add fabric. The photo above shows how creative lampshade designs can get. You can go simple with a single layer of straight fabric. Or add fun embellishments like above. Either way, covering a lampshade in fabric is super easy with the steps below.
- Start by removing the lampshade from the lamp itself.
- Fold some long craft paper around the lampshade. Leave about an inch on both the top and bottom edges of the lampshade. Cut the craft paper, and that will become your template.
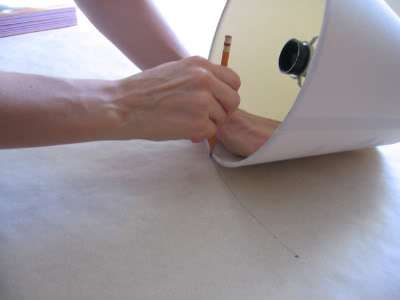
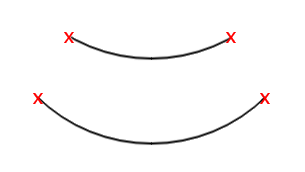
- You can also try the rolling and drawing method, where you roll the lampshade along the craft paper. You place an x where the seam is, trace and roll the lampshade and then place an x where the seam ends up to measure the length of the lampshade. Do this on both the top and bottom sides of the lampshade. The method looks like this, and the pattern you’ll end up with is below (from Fat Orange Cat):
- Place the template against your fabric, and cut the fabric against the template. You may want to use sewing pins to keep the paper in place.
- Make sure that the fabric fits around the shade one time before you apply glue. Then apply a line of fabric glue between the fabric and the shade under that first edge. Wrap the fabric around the lampshade, adding spray adhesive under the fabric as you go. Add more fabric glue under the end seam and fasten down.
- Fold the extra fabric over the edges of the lampshade and secure it with the fabric glue. You may have to cut a bit to fit the fabric around the lampshade brackets.
- You can also add optional embellishments like in the photo above. For instance, you can add lace trim, faux flowers, or fabric emblems using fabric glue.
- Attach the lampshade back to the lamp and admire your work.