One of the easiest ways to add a fun accent to any chair is to place a tie-on cushion. That way, you can add pizzazz to the chair, whether the chair itself has a space for adding fabric accents or not. The photo above from PINSANDPETALS shows how a simple cushion can add tons of color. And making a tie-on chair cushion is super easy. Learn the steps below.
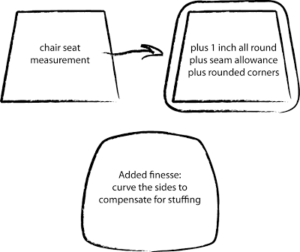
- You’ll need to measure the chair seat. Add an inch to that measurement on each side. Here’s a diagram of your measurements from mmmcrafts:
- Cut two pieces of fabric using the measurements above. You should pin pattern paper to the fabric with the measurements so that you are cutting correctly.
- You can cut at least two adjacent corners so that they’re rounded to give your cushion rounded ends facing outward. Or you can do the rounded edges suggested in the diagram above. Secure the two pieces together using sewing pins at the edges with the inside of the fabric facing outward.
- The tie fabric can be different for contrast or the same as the main fabric. Cut two pieces of fabric so that they’re a couple of inches wide and about two feet long.
- Fold your tie fabric in half length-wise so the inside of the fabric is facing out, and then sew on the long open side and on the short side. Then use a narrow wooden rod to turn it inside out and hide the seam. Do the same with the second tie piece.
- Use sewing pins to fasten those ties in between your two main pieces of fabric on each side at the back. The open side of the tie piece should be facing outward. Make sure the tie lengths are not anywhere near the edges between the fabric to avoid sewing over them.
- Sew the two larger pieces together. Make sure to sew over the tie ends to keep them in place. Leave a small opening in the back for adding stuffing.
- Turn the cushion inside out and stuff it with polyester batting. Then stitch the last bit by hand with a thread and needle.
- You can sew four optional buttons to the top of the cushion for added style.


1 thought on “Make an Easy DIY Chair Cushion”